
springMVC框架
一、spring-web
1、spring框架开发Java项目
spring容器只需要初始化一次即可。
这样我们就写一个工具类。
1 | public class SpringUtil { |
2、spring框架开发web项目
我们也可以使用工具类来初始化spring容器。
我们也可以将spring容器的初始化工作交给tomcat完成。
编写一个servletContextListener:
在Tomcat创建servlet上下文对象时,来初始化spring容器,然后将spring容器绑定到servlet上下文中。
spring框架已经完成这个操作,只需要导入spring-web依赖。
在web.xml中配置这个监听器和spring的配置文件的位置。
1 | <dependency> |
1 | <!-- 初始化spring容器--> |
3、tomcat接受请求
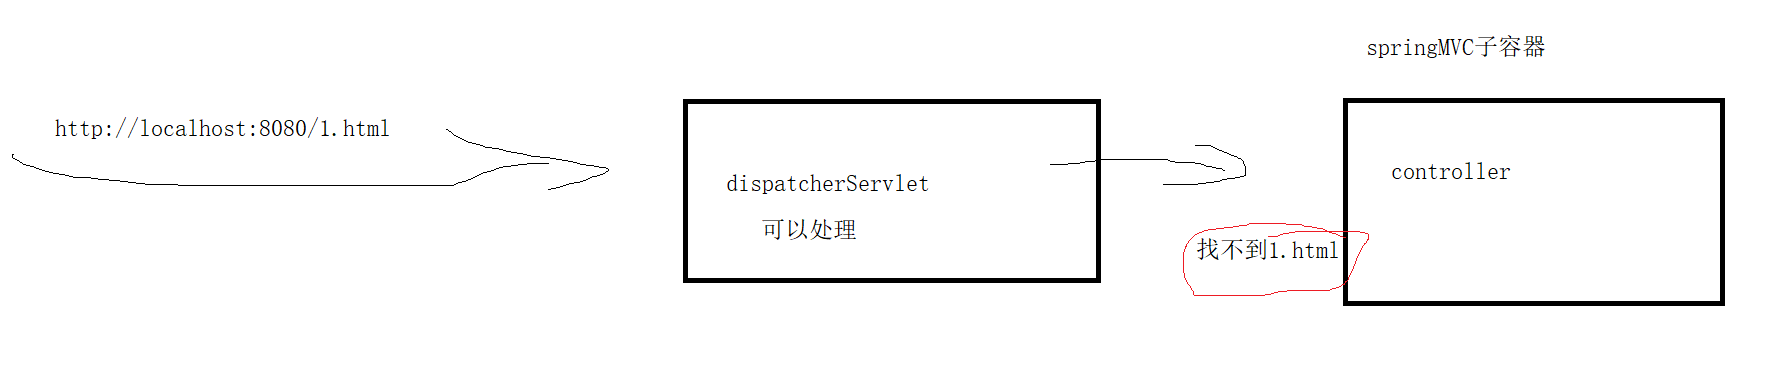
tomcat接受请求,只会去servlet容器中查找对应的servlet对象。
如果将servet放到spring容器中托管,tomcat不会去spring容器中查找。
解决:springMVC
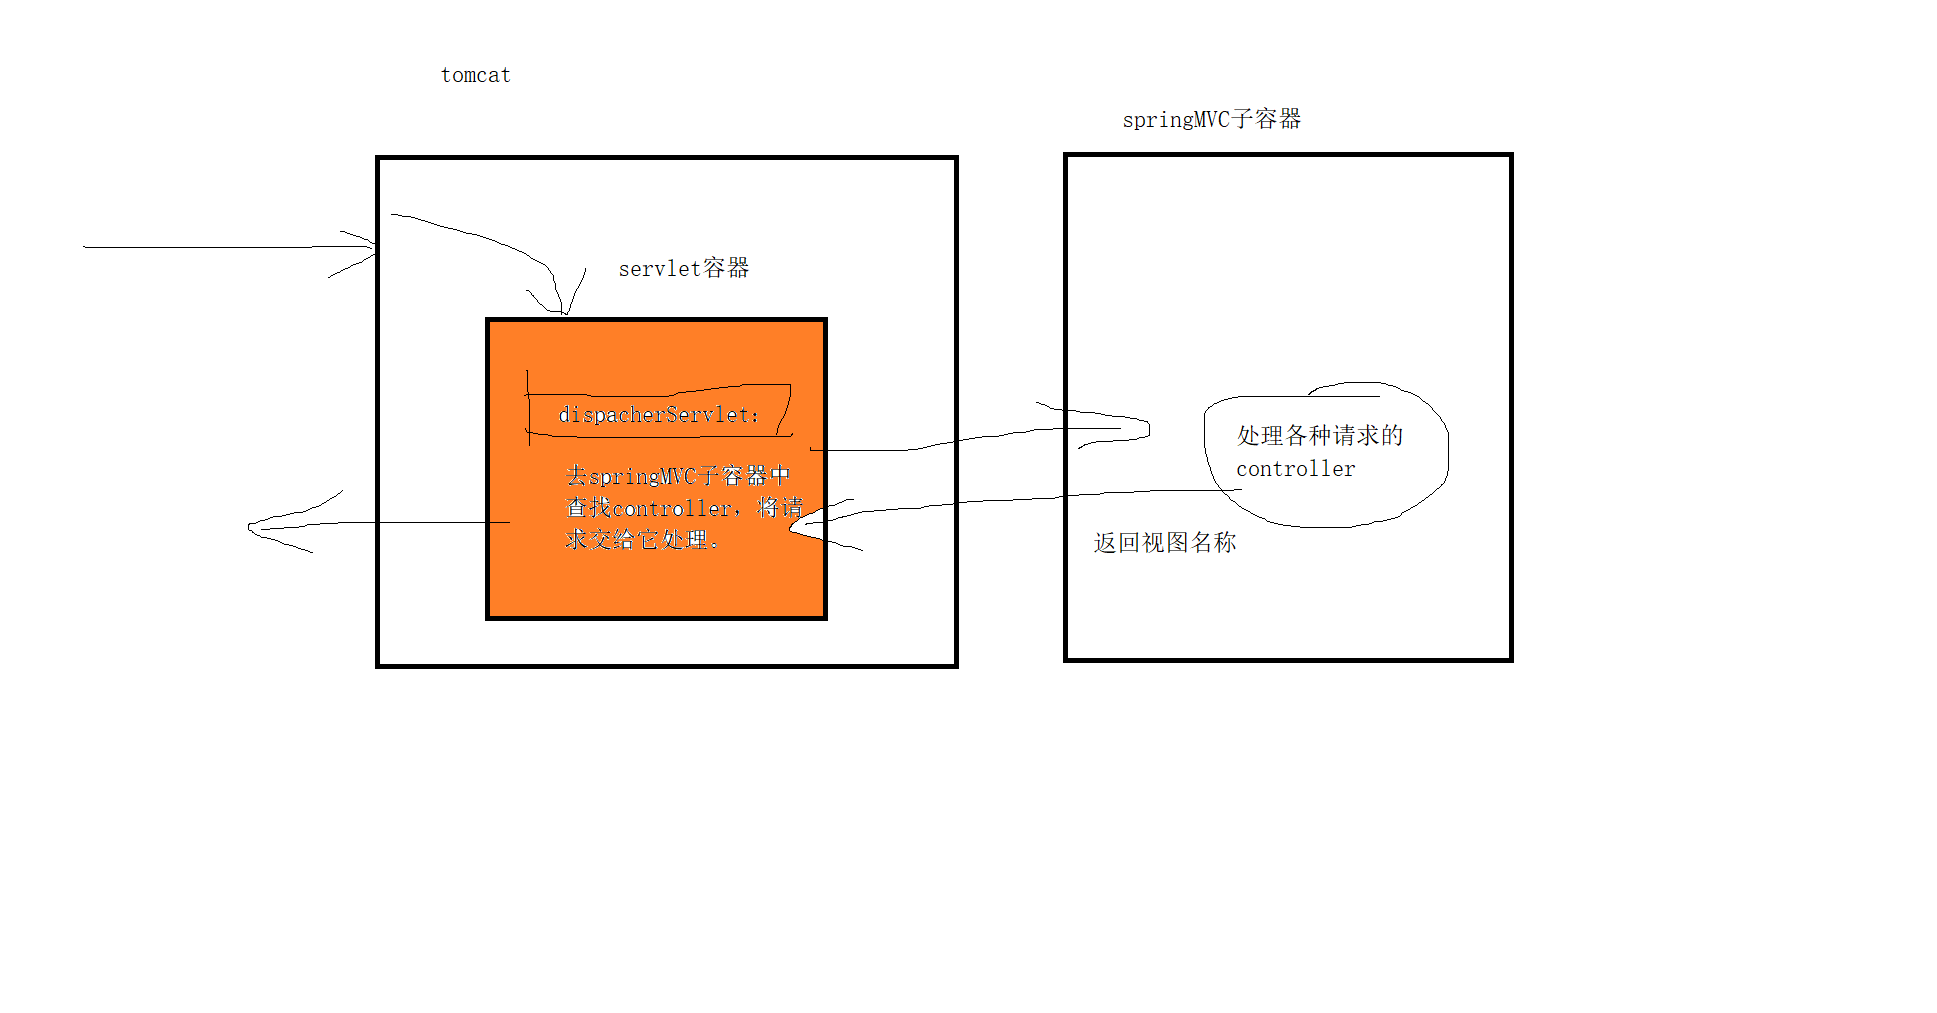
4、父子容器
spring父容器:托管service、dao==
springMVC子容器:必须托管controller
子容器可以依赖父容器中的bean,父容器不能依赖子容器的bean。
ssm框架:所有bean都可以交给子容器托管,无需父容器。
ssh框架:dao层只能托管给父容器。
controller必须托管给springMvc子容器。
原因:dispacherServlet是springMvc提供的,只能转发请求给springMvc的controller。
二、springMVC
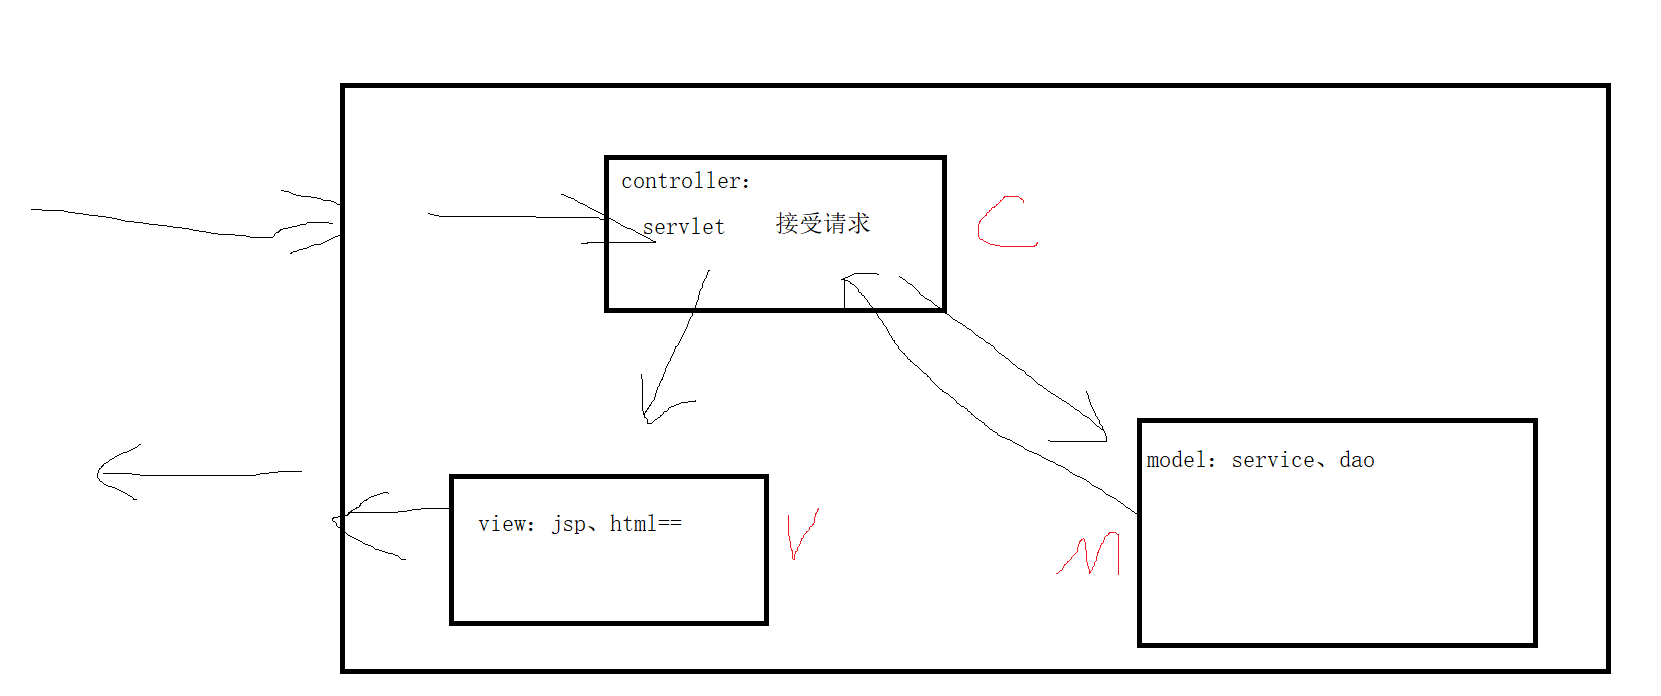
1、JavaEe的MVC开发模型
控制层Controller:使用servlet接受请求。
模型层model:使用javabean(service、dao、实体类、工具类)处理请求。
视图层view:使用jsp或html进行页面展示。
2、springMVC
(1)springMVC框架是spring框架的一个子框架。
使用时,必须先导入spring的依赖。
(2)它是一个MVC的框架。

三、springMVC框架的搭建
1、导入spring框架的依赖
2、导入springMVC框架的依赖
1 | <!-- 导入springMvc的依赖--> |
通过依赖传递,自动下载和导入spring的jar包。
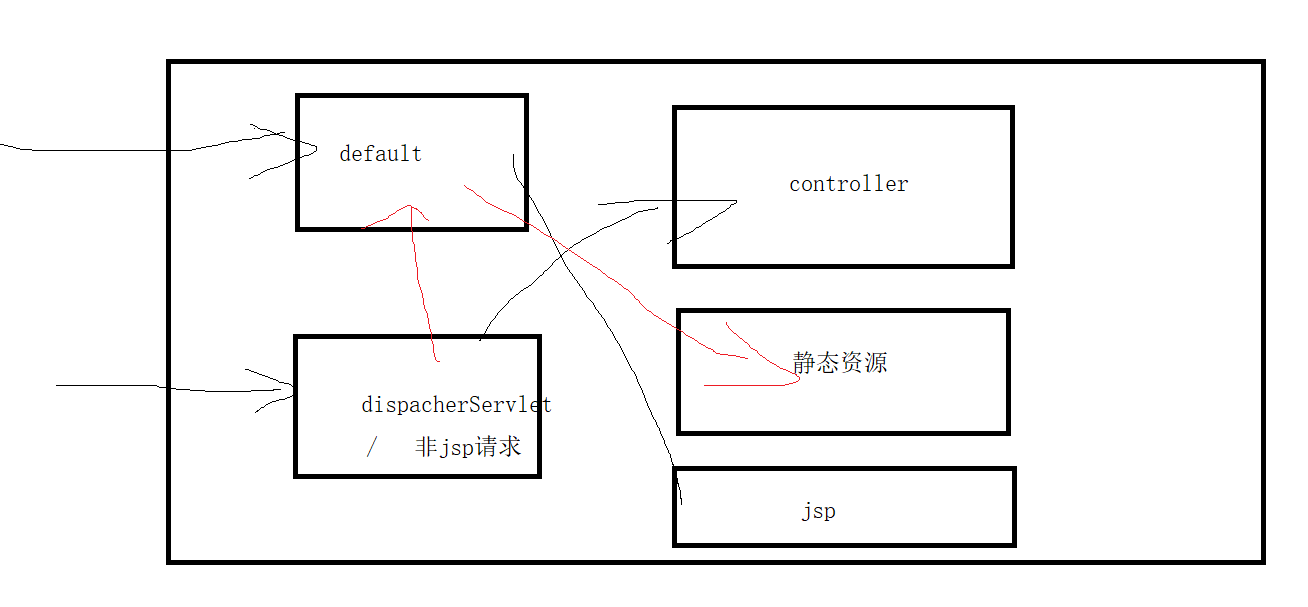
3、在web.xml中配置springMVC提供的前端控制器(核心控制器)DispatcherServlet。
1 | <!-- 配置前端控制器--> |
url-pattern:
1 | *.do 或者 *.action |
1 | / 非jsp的请求(controller和静态资源的请求),推荐 |
1 | /* 所有请求 |
4、springMVC配置文件
默认名字:【servlet-name】-servlet.xml
如果不使用默认名称,需要在web.xml中作出配置说明。
比如:springmvc.xml
1 | <?xml version="1.0" encoding="UTF-8"?> |
四、HelloWorld编写
1、编写controller
1 | package com.yan.controller; |
@Component:bean实例化注解
@Controller
@Service
@Repository
@RequestMapping(“url”) : 请求映射url
@GetMapping
@PostMapping
@PutMapping
@DeleteMapping
2、注解扫描
1 | <?xml version="1.0" encoding="UTF-8"?> |
3、创建视图
1 | <%-- |
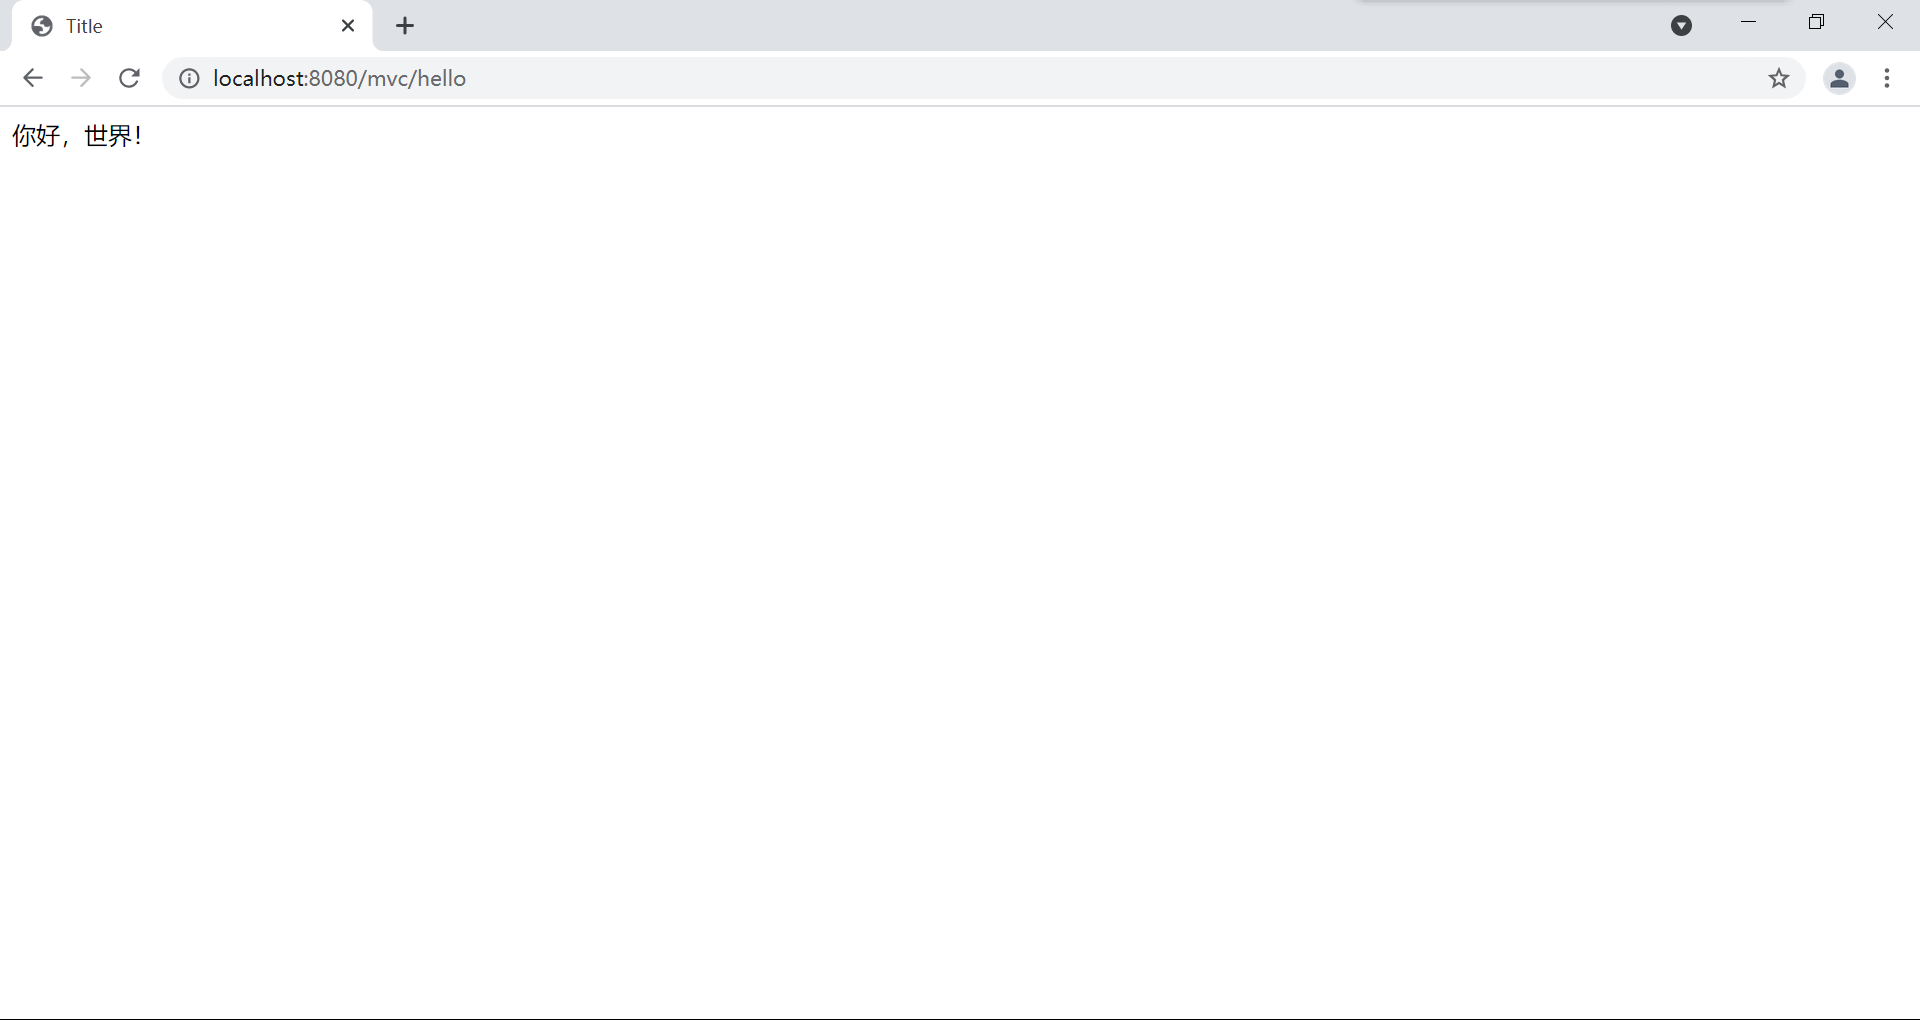
4、测试
将项目部署到tomcat下,启动。
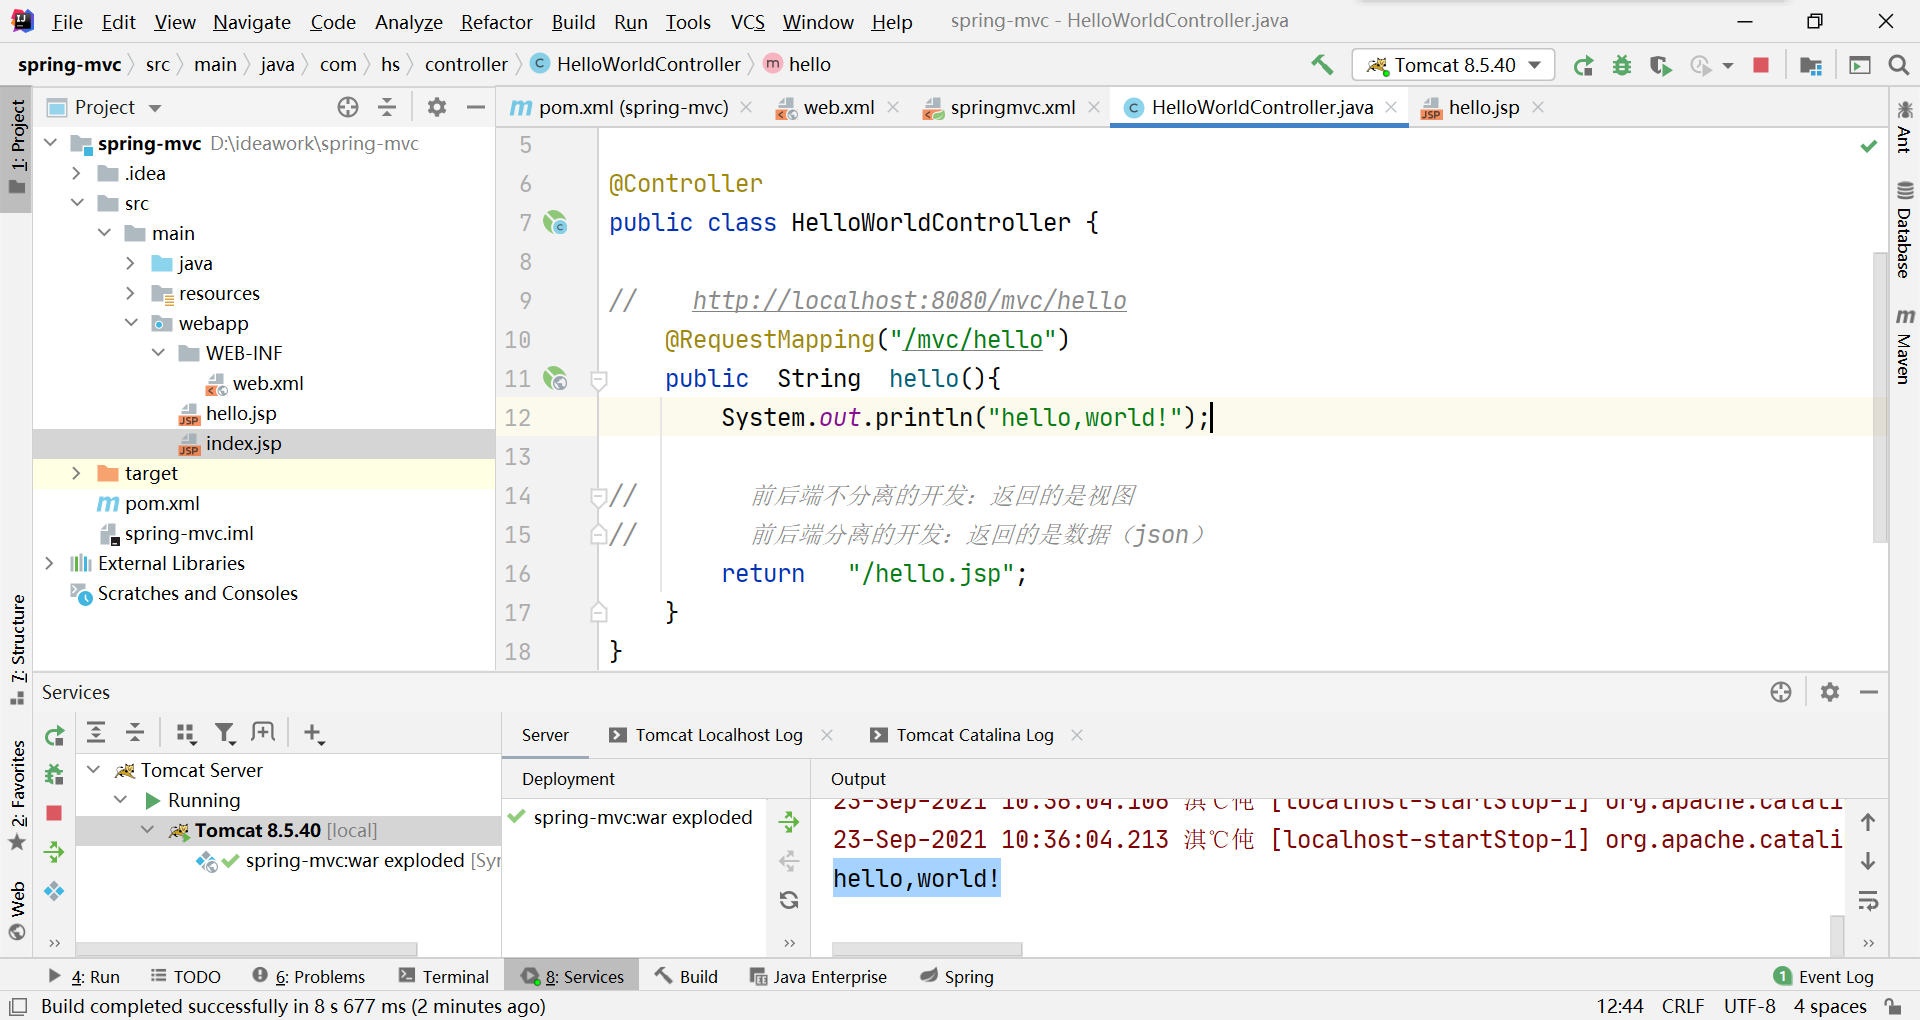
5、简单分析执行流程
(1)浏览器发送请求
(2)tomcat接受请求
(3)tomcat将请求交给dispacherServlet
(4)dispacherServlet将请求转发给HelloWorldController
(5)执行请求映射的方法,HelloWorldController中的hello方法
(6)HelloWorldController返回视图
(7)将视图交给视图解析器
(8)视图解析器返回渲染后的视图
(9)dispacherServlet将渲染后的视图返回给tomcat
(10)tomcat将视图响应给浏览器
五、接受请求参数
1、简单类型的请求参数
(1)请求参数和方法的形参同名:自动传参
1 | @RequestMapping("/mvc/login") |
(2)请求参数和方法的形参不同名:自动传参
需要手动映射
1 | @RequestMapping("/mvc/login") |
2、实体对象接收
对象的属性要和请求参数的名字一致;
如果不一致,需要手动映射。
(1)编写User类
1 | package com.yan.domain; |
(2)编写接受请求的方法
1 | @RequestMapping("/mvc/login") |
3、使用ServletAPI接收请求参数
(1)导入servlet依赖
1 | <!-- servlet--> |
(2)编写controller
1 | @RequestMapping("/mvc/login") |
4、请求参数:一键多值
使用数组
(1)页面
1 | <%-- |
(2)controller
1 | @RequestMapping("/mvc/login") |
5、@RequestBody
一个请求,只有一个RequestBody;一个请求,可以有多个RequestParam。
默认请求参数格式时:键值对格式。
通过请求头设置请求参数格式:Content-Type
常见的值有:
application/x-www-form-urlencoded(请求参数是键值对);
1 | POST/logsys/home/uploadIspeedLog!doDefault.html HTTP/1.1 |
multipart/form-data(上传请求,必须是POST)
1 | POST/logsys/home/uploadIspeedLog!doDefault.html HTTP/1.1 |
application/json(请求参数是json格式)
1 | POST/logsys/home/uploadIspeedLog!doDefault.html HTTP/1.1 |
当前端传递的数据格式是json格式时,一般使用post请求。
后端使用@RequestBody接收。
(1)页面
1 | <%-- |
(2)controller
@RequestBody形参类型:Map或者实体类都可以。
1 | @RequestMapping("/mvc/login") |
(3)导入json依赖
这里使用jackson
1 | <!-- json--> |
(4)启动mvc注解
1 | <?xml version="1.0" encoding="UTF-8"?> |
六、响应视图和数据
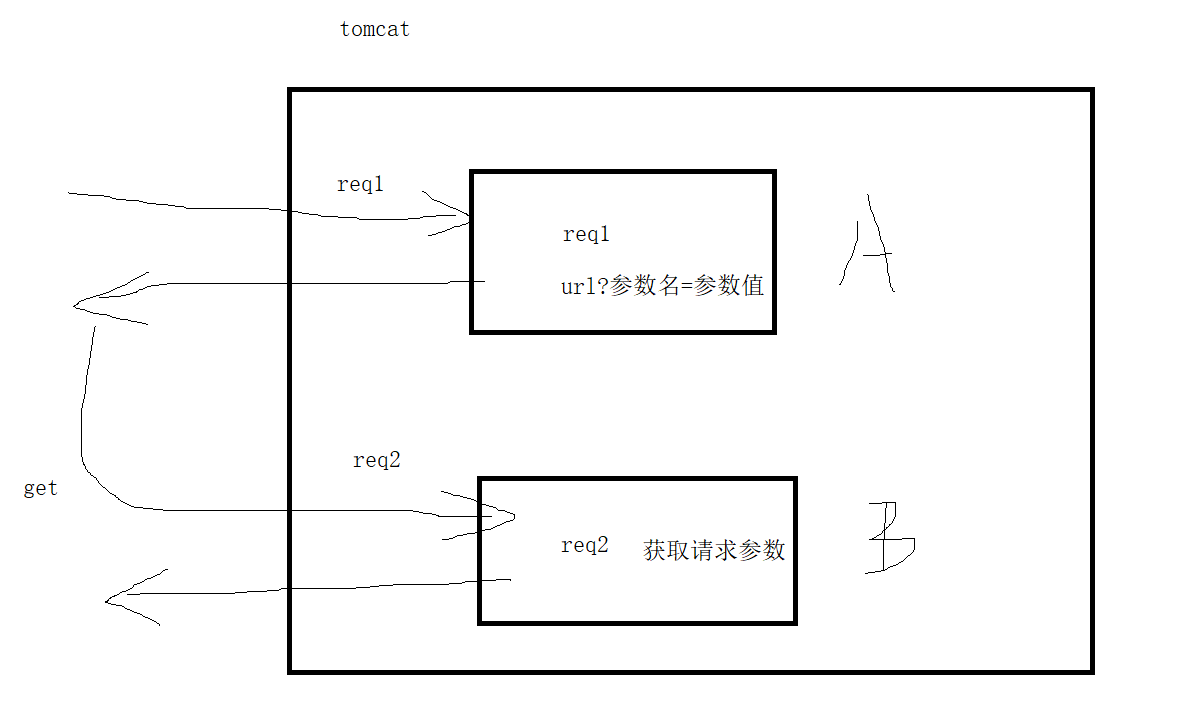
1、请求跳转方式
请求转发:一次请求,通过属性绑定传递数据。
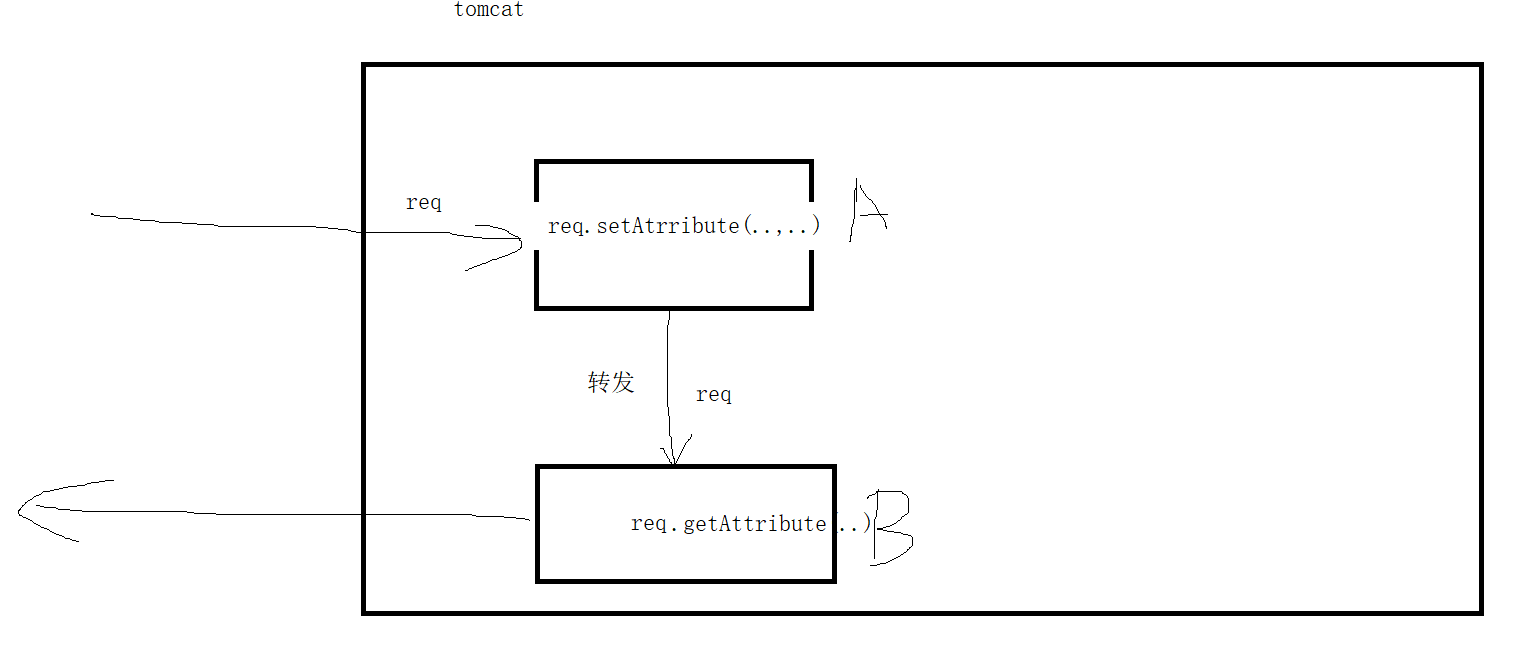
响应重定向:两次请求,通过绑定请求参数传递数据。
2、String和Model
返回一个String视图路径和model数据。
请求转发:
model中的数据,以属性方式绑定到请求对象上。
重定向:
model中的数据,以参数的形式绑定在url后面。
1 | <%-- |
转发:
1 | @RequestMapping("/mvc/login") |
重定向:
1 | @RequestMapping("/mvc/login") |
3、ModelAndView
转发:
1 | @RequestMapping("/mvc/login") |
重定向:
1 | @RequestMapping("/mvc/login") |
4、void和ServletAPI
1 | //转发 |
1 | //重定向 |
七、视图解析器
1、ViewResolver
视图解析器。
它实现了页面和数据的分离。
通过视图解析器,将数据渲染到页面上,返回响应的视图。
2、springMVC视图解析器
有13种,常用的是jsp视图解析器,thymleaf视图解析器,excell视图解析器==。
默认jsp。
3、执行流程
通过controller返回一个modelandview;
dispacherServlet将modelandview交给视图解析器;
视图解析器,通过逻辑view(视图名)转为物理view(视图文件);
然后调用view的render方法将数据渲染视图上;
最后返回渲染后的视图。
dispacherServlet将渲染后的视图给tomcat;
tomcat响应视图。
4、配置视图解析器
1 | <!-- 配置jsp视图解析器--> |
1 | @RequestMapping("/mvc/login") |
注意:转发时,视图解析器自动加前缀和后缀。
重定向时,视图解析器不会加前缀和后缀,需要手动添加。
八、字符集过滤器
1、springMVC提供了请求和响应的字符集过滤器。
1 | public class CharacterEncodingFilter extends OncePerRequestFilter { |
2、如果需要使用,在web.xml中配置即可。
只能解决post请求,和响应的编码问题。
get请求的编码需要在tomcat中配置解决(server.xml)。
1 | <!--配置springMVC的字符集过滤器--> |
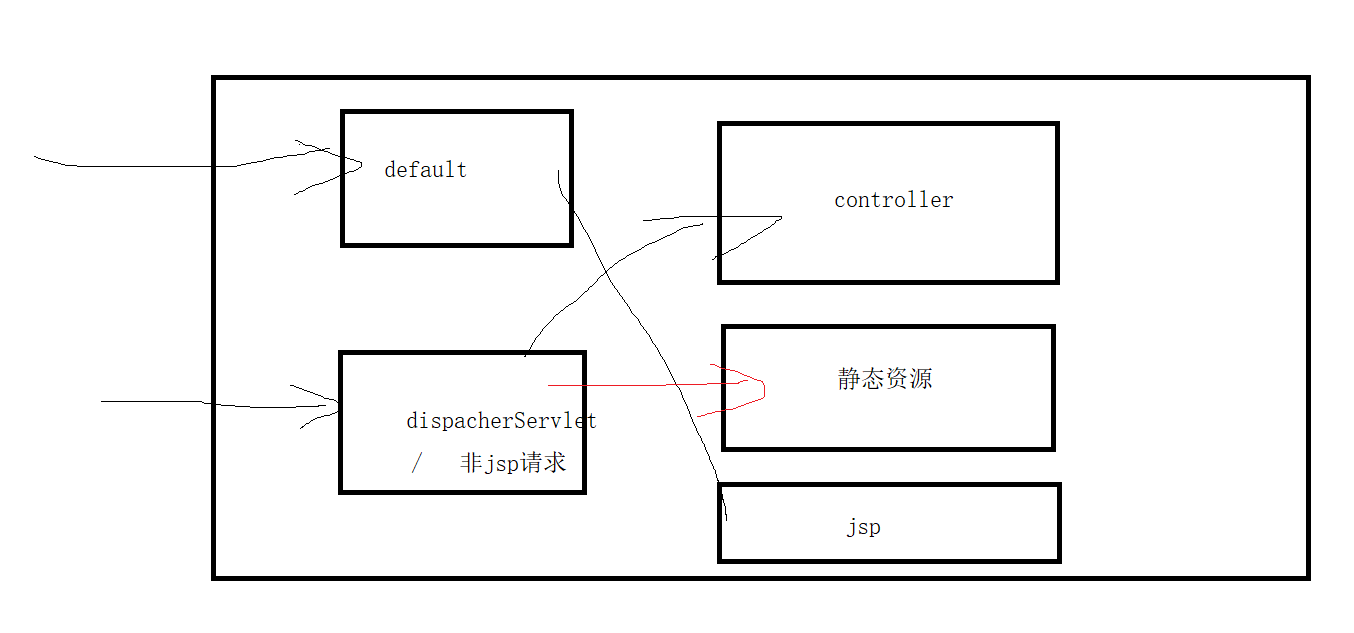
九、静态资源处理
静态资源访问404:
1、使用tomcat缺省Servlet
1 | <!-- tomcat缺省servlet--> |
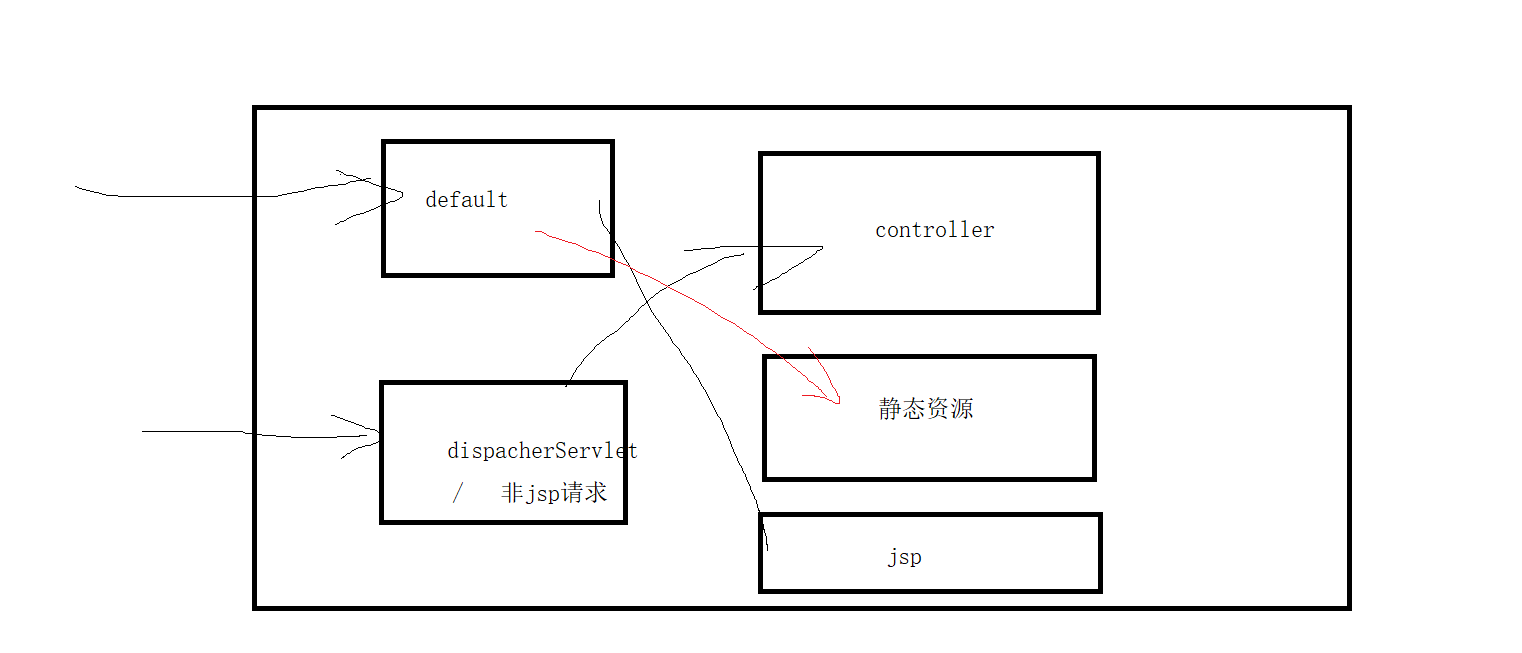
2、交给tomcat处理
记得开启mvc注解驱动
1 | <!-- 静态资源处理:交给tomcat处理--> |
3、指定访问目录
记得开启mvc注解驱动
1 | <!-- 静态资源处理:到指定目录下找--> |
十、前后端分离开发
1、只响应数据,不响应视图
2、注解@ResponseBody
1 | package com.yan.controller; |
3、注解@RestController
1 | @RestController=@Controller+@ResponseBody |
1 | package com.yan.controller; |
4、响应json格式数据
四种常用的jsonAPI:jackson,fastjson,Gson,json-lib
导入jackson依赖
1 | <dependency> |
1 | <!-- mvc注解驱动--> |
(1)json对象
1 | @GetMapping("/json/test1") |
(2)json数组
1 | @GetMapping("/json/test2") |
十一、数据类型转换器
1、类型转换器
(1)作用
遵循 http 协议的 servletreqeust 传输的参数都是 String 类型,但是我们在控制层组件得到的参数都是我们制定或者我们需要的类型,比如 int,double,Object。

(2)springMVC提供的类型转换器
1)标量转换器
名称 作用
StringToBooleanConverter String 到 boolean 类型转换
ObjectToStringConverter Object 到 String 转换,调用 toString 方法转换
StringToNumberConverterFactory String 到数字转换(例如 Integer、Long 等)
NumberToNumberConverterFactory 数字子类型(基本类型)到数字类型(包装类型)转换
StringToCharacterConverter String 到 Character 转换,取字符串中的第一个字符
NumberToCharacterConverter 数字子类型到 Character 转换
CharacterToNumberFactory Character 到数字子类型转换
StringToEnumConverterFactory String 到枚举类型转换,通过 Enum.valueOf 将字符串转换为需要的枚举类型
EnumToStringConverter 枚举类型到 String 转换,返回枚举对象的 name 值
StringToLocaleConverter String 到 java.util.Locale 转换
PropertiesToStringConverter java.util.Properties 到 String 转换,默认通过 ISO-8859-1 解码
StringToPropertiesConverter String 到 java.util.Properties 转换,默认使用 ISO-8859-1 编码
2)集合、数组相关转换器
名称 作用
ArrayToCollectionConverter 任意数组到任意集合(List、Set)转换
CollectionToArrayConverter 任意集合到任意数组转换
ArrayToArrayConverter 任意数组到任意数组转换
CollectionToCollectionConverter 集合之间的类型转换
MapToMapConverter Map之间的类型转换
ArrayToStringConverter 任意数组到 String 转换
StringToArrayConverter 字符串到数组的转换,默认通过“,”分割,且去除字符串两边的空格(trim)
ArrayToObjectConverter 任意数组到 Object 的转换,如果目标类型和源类型兼容,直接返回源对象;否则返回数组的第一个元素并进行类型转换
ObjectToArrayConverter Object 到单元素数组转换
CollectionToStringConverter 任意集合(List、Set)到 String 转换
StringToCollectionConverter String 到集合(List、Set)转换,默认通过“,”分割,且去除字符串两边的空格(trim)
CollectionToObjectConverter 任意集合到任意 Object 的转换,如果目标类型和源类型兼容,直接返回源对象;否则返回集合的第一个元素并进行类型转换
ObjectToCollectionConverter Object 到单元素集合的类型转换
类型转换是在视图与控制器相互传递数据时发生的。Spring MVC 框架对于基本类型(例如 int、long、float、double、boolean 以及 char 等)已经做好了基本类型转换。
(3)自定义类型转换器
第一步,写一个类实现Converter接口,实现converter方法。
1 | public class MyStringToDateConverter implements Converter<String, Date> { |
第二步,配置类型转换器
1 | <!-- 配置类型转换器--> |
1 | <!-- mvc注解驱动--> |
第三步,测试
1 | <%-- |
1 | package com.yan.controller; |
2、请求参数:String->Date
1 | import org.springframework.format.annotation.DateTimeFormat; |
1 | @RequestMapping("/test/cv") |
3、响应json:Date->String
1 | import com.fasterxml.jackson.annotation.JsonFormat; |
1 | package com.yan.domain; |
1 | @RequestMapping("/test/json") |
时区问题:
@JsonFormat(pattern = “yyyy-MM-dd”,timezone = “GMT+8”)
十二、上传和下载
1、文件上传
第一步、导入依赖
commons-fileupload-*.jar
commons-io-*.jar
1 | <!-- 文件上传--> |
第二步,配置文件解析器
1 | <!-- 配置文件解析器--> |
第三步,编写上传页面
1 | <%-- |
注意:请求类型必须时POST,请求内容类型必须是”multipart/form-data“
第四步,编写controller
1 | package com.yan.controller; |
2、多文件上传
1 | <%-- |
1 | package com.yan.controller; |
3、上传重名覆盖问题
需要对上传的文件重新命名,起个唯一的名字。
可以使用uuid。
1 | package com.yan.controller; |
4、文件下载
commons-io-*.jar
@RestController
1 | @RestController |
十三、restful风格
1、restful
它是http编码风格。
2、相关的概念
- 资源与URI
- 统一资源接口
- 资源的表述
- 资源的链接
- 状态的转移
3、资源和URI
要让一个资源可以被识别,需要有个唯一标识,在Web中这个唯一标识就是URI(Uniform Resource Identifier)。
URI既可以看成是资源的地址,也可以看成是资源的名称。
4、统一资源接口
一个资源对应一个唯一的URI。
资源名可以使用单数,也可以使用复数,推荐复数。
URI中只能使用名词表示资源,不能使用动词。
学生资源URI:http://localhost:8080/students
老师资源URI:http://localhost:8080/teachers
员工资源URI:http://localhost:8080/emps
5、资源的表述
我们对资源的操作,转换成请求的方式。
原来:
http://localhost:8080/deleteStudent
http://localhost:8080/addStudent
http://localhost:8080/updateStudent
http://localhost:8080/selectStudent
restful:
查询Get http://localhost:8080/students
添加POST http://localhost:8080/students
修改PUT http://localhost:8080/students
删除DELETE http://localhost:8080/students
6、状态的转移
响应的JSON数据格式:
{
code:操作的状态码,
message:操作的状态描述,
data:展示的数据
}
7、springMVC实现restful编码风格
(1)添加操作
请求方式:POST
1 | <form action="/users" method="post"> |
1 | // @RequestMapping(value = "/users",method = RequestMethod.POST) |
(2)查询所有操作
请求方式:GET
1 | <a href="/users"> 查询所有用户</a> |
1 | @GetMapping("/users") |
(3)查询部分操作
请求方式:GET
1 | <a href="/users/uid/123"> 查询123</a> |
1 | // @GetMapping("/users/uname/{uname}") |
(4)PUT请求和DELETE请求方式的问题
问题:
在Ajax中,采用Restful风格PUT和DELETE请求传递参数无效,传递到后台的参数值为null
原因:
Tomcat会做:
1.将请求体中的数据,封装成一个map
2.request.getParameter(“id”)就会从这个map中取值
3.SpringMvc封装POJO对象的时候,
会进行request.getParamter()操作从map中获取值,然后把值封装到POJO中去。
AJAX发送PUT请求引发的血案:
PUT请求,请求体中的数据,request.getParamter()拿不到
Tomcat一看是PUT请求,就不会把请求体中的key-value封装到map中,只有POST形式的请求会才封装到map中去。
解决方案:
方案一,如果是PUT或DELETE,使用POST请求。
这样tomcat就可以获取请求参数了,但是restful编码风格需要的是PUT或DELETE。
springMVC提供了一个过滤器:在服务器端,根据参数”_method”,将POST再改成PUT或DELETE。
HiddenHttpMethodFilter
必须满足条件:POST,_method,application/x-www-form-urlencoded
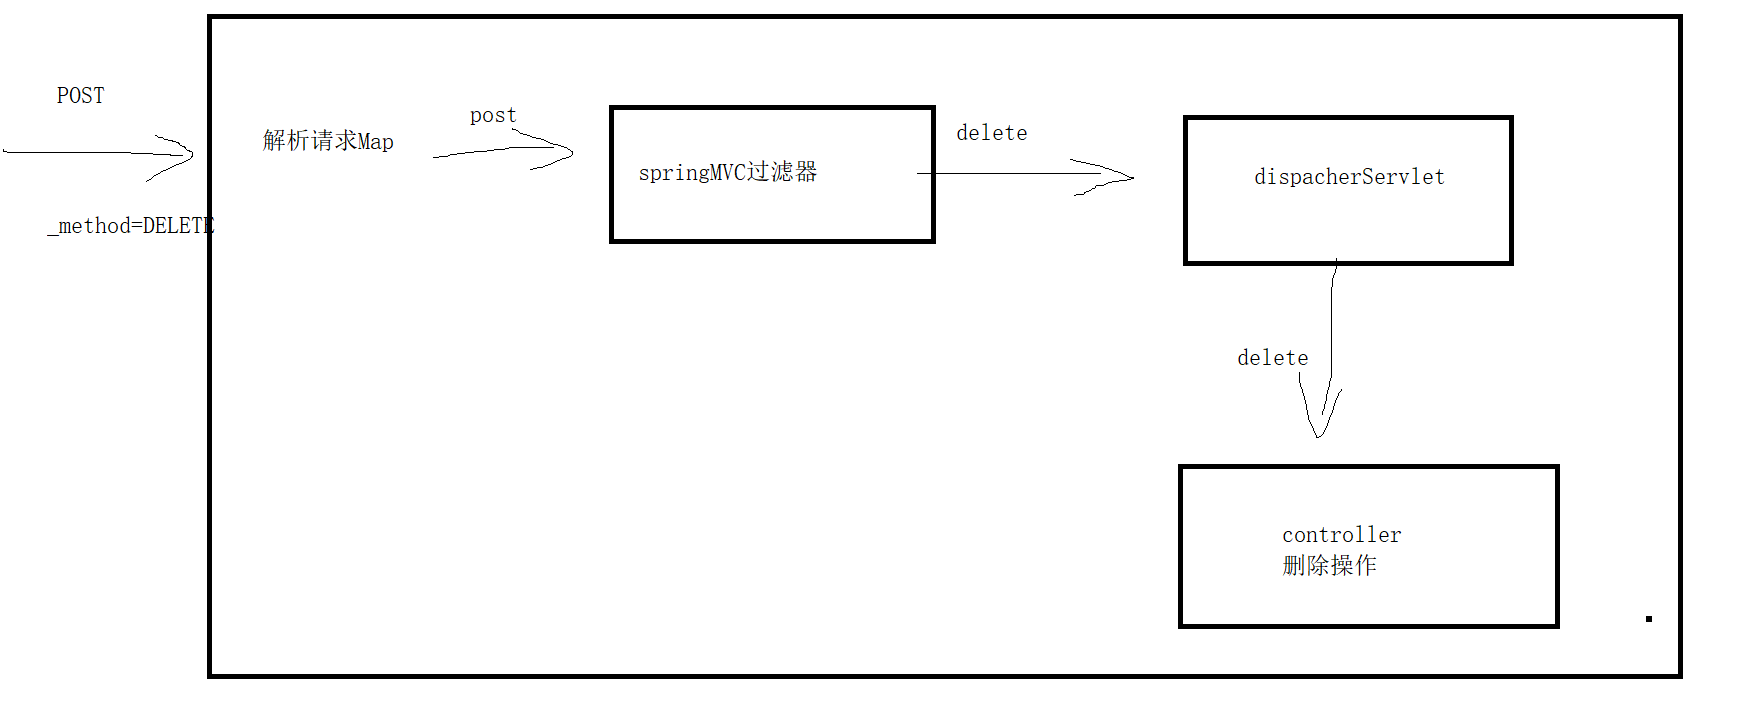
方案二,直接发送PUT或DELETE请求。
springMVC提供了一个过滤器:专门解析请求参数,封装map。
HttpPutFormContentFilter
(5)删除操作
1 | <!-- post请求转put或delete--> |
1 | <button onclick="delete11();">删除123</button> |
1 | @DeleteMapping("/users") |
(6)修改操作
1 | <button onclick="update11();">修改123</button> |
十四、拦截器
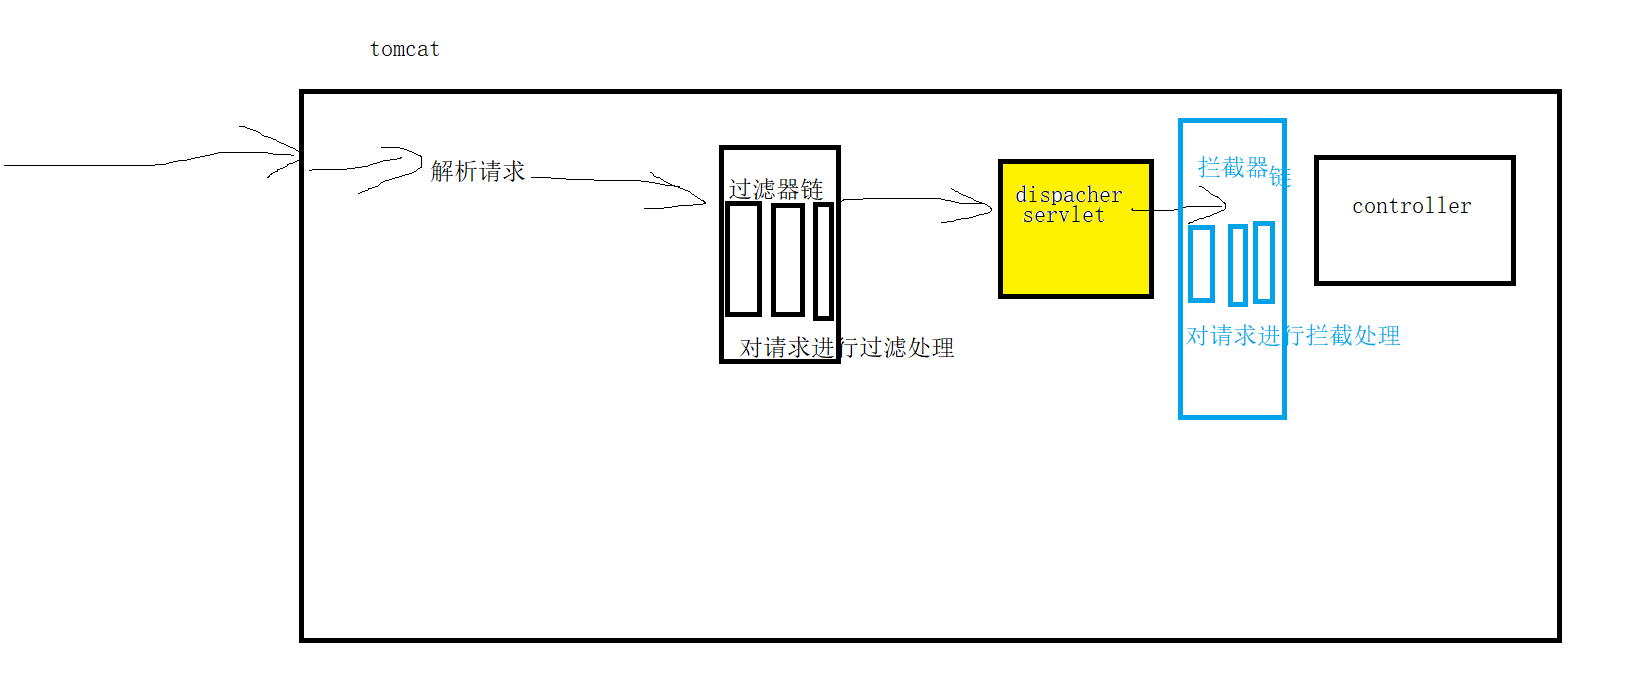
1、拦截器
拦截器是用来拦截请求,对请求进行处理。
和过滤器的作用一样,只是出现的时机不同。
过滤器是tomat提供的一个servlet组件,用于过滤发给web资源的请求(jsp,servlet==)。
拦截器是springMVC提供的一个组件,主要用于拦截发给controller的请求。
2、拦截器使用场景
登录验证
字符集设置
数据校验
权限验证
日志
==
3、自定义拦截器
1 | @Controller |
第一步,实现HandlerInterceptor 接口(或者继承抽象类)
1 | package com.yan.interceptor; |
第二步,配置拦截器
1 | <!-- 配置拦截器作用的路径 --> |
1 | <!-- 配置拦截器--> |
第三步,开启mvc注解驱动
1 | <!-- mvc注解驱动--> |
第四步,测试
preHandle:1111
controller
postHandle:1111
afterCompletion:1111
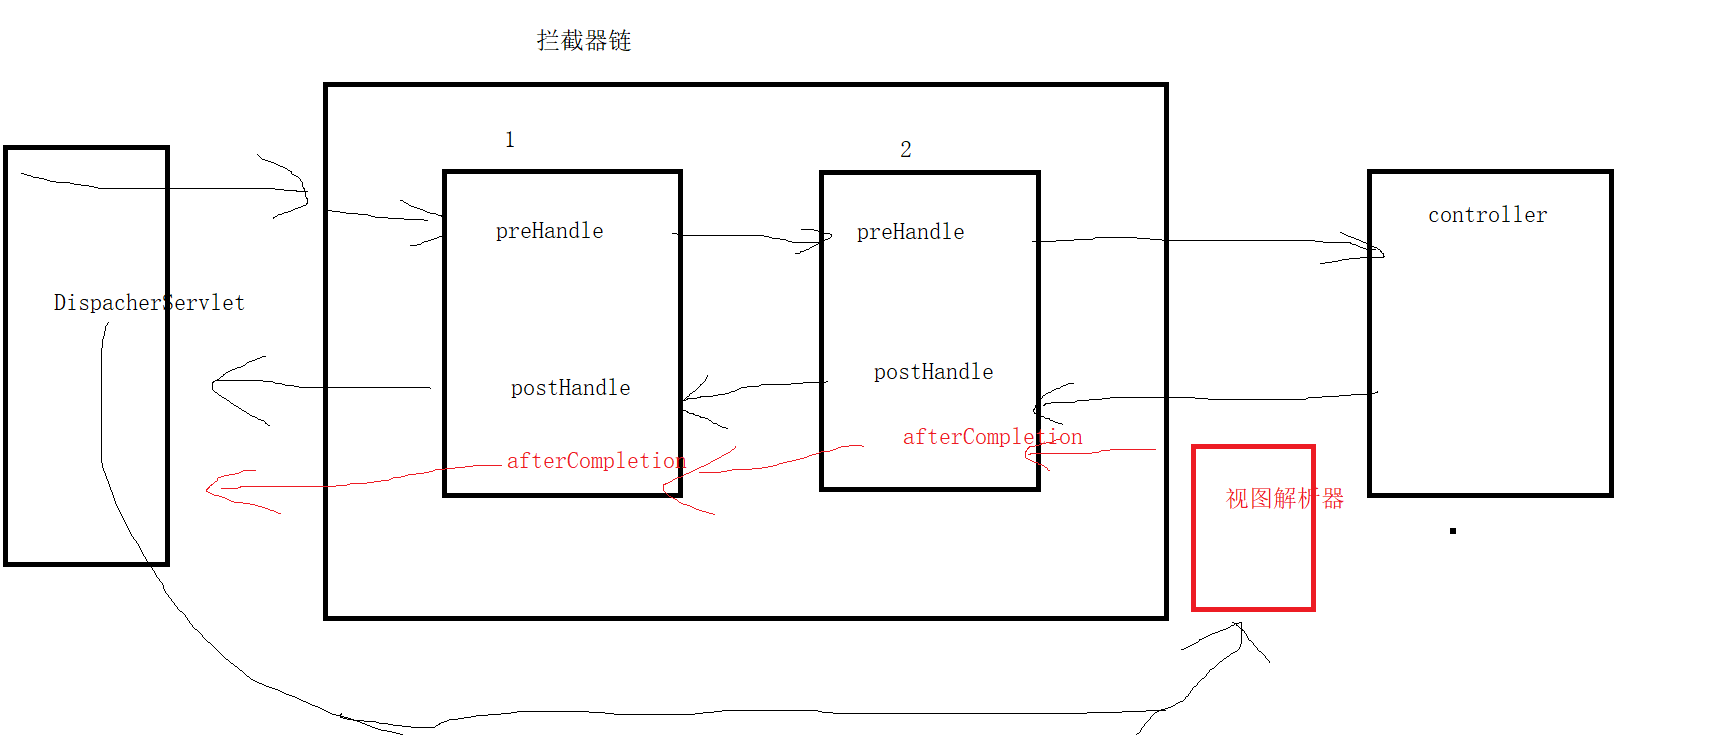
4、拦截器链
我们将拦截同一请求的拦截器放到一个拦截器链中。
1 | <!-- 配置拦截器--> |
测试:
preHandle:1111
preHandle:2222
controller
postHandle:2222
postHandle:1111
afterCompletion:2222
afterCompletion:1111
执行顺序:
十五、异常处理
十六、spring整合springMVC
1、父子上下文
2、整合